A trusty tool belt is a vital companion for any professional who works with their hands. It keeps your essential tools organized and readily accessible, saving you time and frustration on the job. However, wearing a tool belt incorrectly can lead to discomfort, fatigue, and even injury.
To maximize your efficiency and safety, it is crucial to understand how to wear a tool belt properly.
Wear A Tool Belt Properly! Say No To Obstacles In Work

A tool belt helps you to work without any obstacles in your workflow. Learn how to wear a tool belt properly and eliminate every obstacle while working.
How To Wear A Tool Belt Properly Like A Pro?
| Step | Description |
|---|---|
| Step 1: Check the Tool Belt | Inspect for damage, rust, and secure all buckles and hooks for safety. |
| Step 2: Organize the Tools | Arrange tools based on frequency of use; place heavy tools on hooks and small tools in pockets. |
| Step 3: Balance the Tool Belt | Ensure even weight distribution to avoid neck, back, and shoulder strain. |
| Step 4: Wear and Lock Properly | Adjust belt snugly; wear pockets at the back for bending/climbing, front for frequent access. |
| Step 5: Attach Suspenders | Use suspenders to distribute weight and reduce strain on the waist. |
| Step 6: Keep Hands Free | Use the tool belt for carrying tools, keeping hands free when climbing or working. |
Wearing a tool belt the right way is crucial for comfort, efficiency, and even safety. By following these simple steps, you can ensure your tool belt becomes a valuable asset instead of a source of discomfort.
Step 1: Check the Tool Belt Before Wearing
Before strapping on your tool belt, give it a quick once-over. Look for any tears, splits, or damages. Check those pockets too! Small problems can become big if ignored. Ensure buckles, hooks, and connectors are rust-free and close securely.
Keeping your tool belt in top shape is crucial when dealing with heavy tools for safety’s sake.
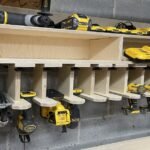
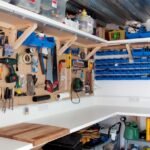
Step 2: Organize the Tools
Don’t just toss your tools into random pockets. Be a bit strategic and organize your tool belt properly! If you’re right-handed, keep your go-to tools on the right side. Prioritize them based on how often you use them. Less-used tools can chill on the left side. Heavy tools should hang on hooks, not in pouches.
Small tools? Tuck them into pockets and seal them up tight. It might take a little time, but once you’ve got the system down, finding your tools becomes a breeze.
Step 3: Balance the Tool Belt
With all your tools in place, try on the belt. Make sure it feels balanced. Uneven weight can lead to aches in your neck, back, and shoulders, especially during long hours of wear. It is considered one of the best way to wear tool belt.
Step 4: Wear the Belt and Lock It Properly
Time to put on your belt! Buckle up snugly, and double-check that the pouches and pockets are facing out. Whether to wear the belt front or back depends on your job. For bending or climbing, go with the pockets at the back.
For jobs that require frequent tool grabbing, front-facing is the way to go. If you can, opt for belts with side pockets for added safety.
Remember to shift the weight around to avoid discomfort and pressure in one area. If needed, suspenders can be a game-changer.
Step 5: Attach the Suspenders to the Belt
Suspenders add an extra layer of comfort. Once you find that sweet spot for your belt, attach the suspenders using four hooks (two in front and two in back). Tighten them up, securing the back and chest lines. Fasten as needed, and voilà—no more heavy waistline!
Step 6: Keep Your Hands Free
The whole point of a tool belt is to free up your hands. So, when climbing ladders or trees, don’t carry tools in your hands. It’s as simple as that. Let your tool belt do its job. After all, you have set it up for a reason.
Once you have got everything in place, enjoy the freedom of having your hands ready for whatever task comes your way. Follow these steps, and you will be the tool belt master on the job!
Get the Best Deals on Tool Belt
How to Wear a Tool Belt Front or Back?
To wear a tool belt front or back effectively, follow these steps:
- Positioning: Decide whether to wear the pouches in the front or back. Wear the pouches at the back for tasks requiring frequent bending to avoid obstruction.
- Adjust the Fit: Put the belt around your waist, ensuring it sits comfortably below your traditional belt line. Adjust it so you can easily place your hands on your hips.
- Weight Distribution: Balance tools across both sides of the belt. Place heavier items, like hammers, on one side and lighter tools on the opposite side to maintain stability.
- Secure Tools: Ensure all tools are securely placed in their designated pockets to prevent them from falling out while moving.
- Consider Suspenders: If the belt feels heavy, use suspenders to distribute weight evenly across your shoulders.
- Practice Movement: Move around to ensure comfort and accessibility of tools, adjusting as necessary for optimal efficiency and ease of access.
Safety Measures While Wearing A Tool Belt
The safety measures while wearing a tool belt are mentioned below:
Avoiding Overloading the Tool Belt
Here’s a simple rule – don’t overload! Putting too many tools in your belt might seem like a time-saver, but it can be a safety risk. If it gets too heavy, it might pull you off balance or strain your back. Keep it sensible and stick to the essentials. Your tool belt is like a superhero utility belt – efficient, but not magical.
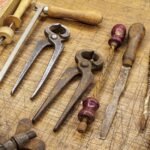
Inspecting Tools for Wear and Tear
Take a moment to look at your tools. Are they in good shape? If you spot any cracks, bends, or missing pieces, it’s time for some tool TLC. Worn-out tools might not work properly and could even cause accidents. Remember, a well-maintained tool is a safe tool.
Proper Handling of Sharp or Dangerous Tools
Handle sharp tools with care. That might sound like common sense, but it is easy to get comfortable with your tools. Always grab them by the handle, not the sharp end. When you are not using them, keep them secured in your belt.
Don’t overload, keep your tools in good shape, and handle the sharp ones with care. It is not just about getting the job done; it is about getting it done safely. So, let’s keep those safety goggles on and dive into the next task with confidence!
Get the Best Deals on Tool Belt
How To Wear A Tool Belt With Suspenders?

Wearing a tool belt with suspenders can add extra comfort and support, especially if you carry a heavy load of tools. It is the best way to wear a tool belt. Here’s a step-by-step guide on how to wear a tool belt with suspenders:
Step 1: Set Up Your Tool Belt
Before attaching suspenders, ensure your tool belt is properly set up. Organize your tools based on your preferences, and make sure the belt fits snugly around your waist.
Step 2: Choose the Right Suspenders
Opt for suspenders that are adjustable and comfortable. Some tool belts come with built-in suspender attachments, while others may require separate suspenders that you can attach.
Step 3: Attach the Front Suspenders
If your suspenders have front and back attachments, start by connecting the front ones. Fasten them to the front of your tool belt, usually near the belt buckle or on the sides.
Step 4: Attach the Back Suspenders
Connect the back suspenders to the rear of your tool belt. Make sure they are evenly spaced and securely attached.
Step 5: Adjust the Length
Adjust the length of the suspenders to your liking. The goal is to have them comfortably support the weight of the tool belt without pulling too tight or sagging. You can usually adjust the length using sliders or buckles on the suspenders.
Step 6: Put on Your Tool Belt
Now that your suspenders are attached and adjusted, put on your tool belt. Ensure that the belt sits comfortably on your waist and that the suspenders are not twisted or tangled.
Step 7: Secure the Tool Belt
Fasten the tool belt securely around your waist using the regular buckle or fastening system. The suspenders should complement the belt, providing additional support rather than bearing the full weight.
Step 8: Check for Comfort
Move around a bit and check if the tool belt and suspenders combination feels comfortable. Adjust the length or positioning if needed to distribute the weight evenly.
Step 9: Final Adjustments
If your suspenders have additional adjustment points on the back, make any necessary final adjustments for comfort and fit.
Wearing a tool belt with suspenders not only adds comfort but also helps distribute the weight more evenly, reducing strain on your lower back during extended periods of use. Adjust as needed, and you’re ready to tackle your tasks with ease!
Get the Best Deals on Tool Belt
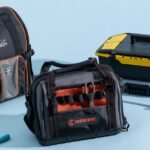
Factors To Consider While Buying a Tool Belt

Buying a tool belt is an important decision, as it can significantly impact your comfort and productivity on the job. To avoid pain and discomfort, consider the following factors to choosing a perfect tool belt:
Weight and Distribution
- Material: Choose a lightweight material for tool belts like nylon or canvas, especially if you carry multiple heavy tools. Leather is more durable but heavier.
- Belt Width: A wider belt distributes the weight of your tools more evenly across your hips, reducing pressure points.
- Suspenders: Consider using suspenders to transfer the weight of the belt from your hips to your shoulders for added comfort, especially for long wear or heavy tools.
Padding and Support
- Lumbar Support: Look for a belt with built-in lumbar support to protect your lower back from strain.
- Padding: Padded belts offer cushioning and comfort, especially important for extended wear.
- Mesh Lining: Mesh lining allows air circulation and prevents sweating, keeping you cool and comfortable.
Size and Fit
- Measure Your Waist: Ensure the belt fits snugly but not too tight, allowing for movement and bending.
- Adjustable Design: Look for a belt with an adjustable design to accommodate changes in weight or clothing layers.
- Consider Your Body Type: If you have a larger waistline, opt for a belt with wider straps and a larger buckle for additional support.
Tool Pouches and Organization
- Number and Size of Pouches: Choose a belt with enough pouches to hold all your frequently used tools.
- Pouches With Closures: Pouches with flaps or zippers prevent your tools from falling out when you bend or kneel.
- Customizable Pouches: Some belts allow you to move or remove pouches to suit your specific needs and preferences.
- Easy Access: Ensure the pouches are positioned for easy access and removal of your tools.
Material and Durability
- Leather: Offers superior durability and longevity but requires regular maintenance.
- Nylon or Canvas: More lightweight and affordable, but may not be as durable as leather.
- Double Stitching: Look for belts with double stitching for added strength and tear resistance.
- Metal Hardware: Metal buckles and rivets are less likely to break or wear out compared to plastic alternatives.
Additional Features
- Hammer Loop: A dedicated hammer loop frees up space in your pouches and provides easy access to your hammer.
- Tape Measure Clip: A clip for your tape measure keeps it readily available and prevents it from getting tangled in your tools.
- Pen and Pencil Holder: A dedicated holder keeps your writing instruments handy and prevents them from getting lost.
Bonus Tip: Always try on a tool belt before purchasing it to ensure proper fit and comfort.
The Final Words
So, let’s sum it up! Wearing a tool belt is more than just strapping on some gear, it is about making your work easier and safer. Remember to check your belt before wearing, organize your tools smartly, balance the weight, and lock it in snugly.
In the grand scheme of things, wearing a tool belt properly might seem like a small detail, but it is a game-changer. It is about efficiency, safety, and having the right tool at your fingertips when you need it.
So, buckle up, organize those tools, and step into your next project with confidence. Your tool belt is ready for action – are you?
FAQs (Frequently Asked Questions)
Where to position a tool belt?
Position a tool belt around your waist, just below your regular belt line. Make sure it sits comfortably and allows easy access to tools while bending or reaching. Balance the weight evenly on both sides.
Should you wear a tool belt in the front or back?
This depends on your personal preference, comfort, and the task you are performing. Both positions have pros and cons.
Why does my tool belt hurt my hips?
A tool belt may hurt your hips due to improper weight distribution, excessive load, or poor fit. Carrying too many tools can strain your hips, especially if the belt hangs unevenly. To alleviate discomfort, ensure even weight, adjust the fit, and consider using suspenders for support.
How can I prevent pain when wearing a tool belt?
To prevent pain when wearing a tool belt, choose a padded belt for comfort, distribute tools evenly, and avoid overloading it. Take regular breaks to stretch, maintain good posture, and consider using suspenders to help support the weight and reduce strain.
Do tool belts go on hips or waist?
Tool belts are usually worn on the hips, just below the waist. This position allows easy access to tools while keeping them secure and balanced during work.